Thursday, March 28, 2013

Digging in the Dirt at the Santa Rita Ruins

"Archaeology is the search for fact. Not truth. If it's truth you're interested in, Doctor Tyree's Philosophy class is right down the hall. So forget any ideas you've got about lost cities, exotic travel, and digging up the world. We do not follow maps to buried treasure, and 'X' never, ever marks the spot. Seventy percent of all archaeology is done in the library. Research. Reading."                                                                                                                         Indiana Jones
 

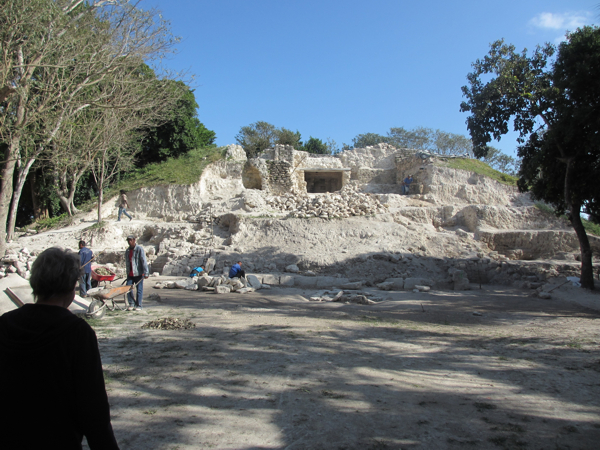
Front entrance to Santa Rita

Indy may have been right about the research and reading bit, but when you live here in Corozal and have Mayan ruins practically in your backyard, it's hard to not to get excited about the possibility of finding buried treasure.

The Santa Rita ruins date back to about 2000 B.C. The external temple contains numerous interconnected doorways and rooms and a central room where offerings were burned. Two burial areas were found, one containing an elderly woman with jewelry and pottery, dates back to the Early Classic period. The second burial was dated to 500 A.D. and was discovered inside a large tomb. Findings indicate a warlord was buried there and was found with a ceremonial flint bar and stingray spine used in blood-letting rituals.

Each year since 2001, through its U.S. Ambassador’s Fund for Cultural Preservation (AFCP), the U.S. State Department’s Bureau of Educational and Cultural Affairs Cultural Heritage Center has assisted eligible countries in preserving their cultural heritage. The AFCP awarded BZ$100,000 to the National Institute of Culture and History’s Institute of Archaeology for the conservation of Santa Rita in recognition of its cultural importance.  Representatives from the National Geographic Society oversee the excavation efforts, but volunteers are welcome to lend a hand seven days a week.

"If we knew what was there, we wouldn’t have to dig."
Richard Boisvert
NH State Archaeologist

 
I first went to the ruins about three weeks ago with my friend, Dianna. After checking in with the site supervisor, we were directed to a spot at base of the temple and were shown an area about 4' x 3' where we could begin to dig.


The site crew provides tools for volunteers to use, including a hand picks, paintbrushes, and...


...the all important trowel. You work from the top down, scraping slowly and methodically, mostly with the trowel to see what, if anything, is buried in the dirt. For the longest time, all we found were small stones and snail shells. But as time went on, we started unearthing shards of pottery, which you see as that little pile in the shot above.

To provide some incentive for our digging, one of the supervisors stopped by to show us artifacts that had been unearthed nearby just a few days earlier:


And while being able to see and touch this find was pretty amazing, after a few hours of digging, we were ready to call it a day. Both of us were covered in dirt and dust from head-to-toe, and I'm here to tell you that a shower was in quick order when I got home.

A couple of weeks after that dig, a bunch of us met up at the site to dig some more.


If you compare the shot above with the first one, you can see just how much progress has been made from the last time we were there in unearthing all those stone steps.


From the left: Dave, Bruce, Colleen, and Dianna

Bruce and Colleen go almost every day to ruins and are well known to the crew. It's easy to understand how this can become an addiction. Just when you think you can't dig any longer, lo and behold, you start finding all kinds of pottery shards of all shapes and sizes. On this particular day, we uncovered quite a few, some with raised designs, others with painted symbols.

I feel very lucky to be able to be part of all this, even in a very tiny way. I've learned so much more about this area's history and have gained a deep appreciation for those people who choose archeology as a career. It's hard work, and I only did it a couple of times for a few hours at a clip. I found muscles in my hands and back that I didn't even knew I had. And after being in a sitting position for an extended period of time, there was no ladylike way to bounce right up. Rather it was a case of getting on my knees and pushing up one leg at a time. Egad, talk about a not-so-subtle reminder of aging. And to think folks who take up this profession dig and dig and dig and may not find anything of value at all. As I said, my hat is off to them and I'm grateful that there are those people who have the wherewithal to do this kind of work. It's because of them that people like me can literally touch history.

Monday, March 25, 2013

Slices of Life from Belize: March 25, 2013

"Seafish"

Here in Corozal, it's common for vendors to travel the local roads hawking their wares. And by their wares, I mean they generally are trying to sell veggies, fruits, sandwiches, seafood, and those kinds of things. Most get around on their bicycles, but there is one guy who has a car outfitted with a loudspeaker. You can hear him coming from miles away shouting, "Tamales, tortillas, orange juuuuice." Cracks me up every time I hear him.

Up until about a month or so ago, we didn't get anyone stopping by trying to sell us anything. It wasn't surprising, when you consider we are literally off the beaten path. But about two weeks ago, a guy showed up, on his bike, selling fish...freshly caught and cleaned...and in his backpack.

We ended up buying this handsome specimen:


When we asked what kind of fish it was, we were told "it's a seafish." Ummm, not exactly helpful, but it was clearly fresh and weighed probably five or so pounds. And as we had just been talking about getting a whole fish and filleting it ourselves, just to see what would be involved, well, why not? If anyone cares to venture a guess on what type of fish this is, feel free to shout it out in the comments section below.

David got to work filleting and skinning it, which went better than we expected, and we ended up with three lovely fillets:


While I could have just popped them into the freezer, I decided to cook them that very night. One of my favorite ways is to saute them in a beer sauce. I know, it sounds weird, but it really is yummy.

First you saute some onions in a bit of olive oil. When soft and translucent, pour in a bottle of beer. I use Belikin, because after all, it's the beer of Belize.


When the beer has reduced by about half, lay the fillets on top and place a few slices of tomato on top of each and season to taste:


Pop the pan into a pre-heated 400-degree oven for about 10 to 12 minutes.

Voila:


I made some recado seasoned white rice to serve alongside and placed the fillets, with their tomatoes, on the plate, spooned some of the onion beer sauce over the whole shooting match and garnished with a bit of chopped parsley. 

Seafish -- it's what's for dinner.

Solar Attic Fan

As I've mentioned in some previous posts, it gets hot here. I mean, HOT, especially during the summer. (Although as a quick aside, we had abnormally steamy weather yesterday. The temperature was somewhere in the 90s, and the heat index was triple digits. No one we talked to could remember it being that hot this time of the year. Must be that danged climate change stuff.)

Anyway, when the sun hits the back of our house, it can be brutal. We learned very quickly last summer to shut the back door and kitchen window louvers no later than noon. If we forgot, you could feel waves of heat rolling in that would almost knock you over. And if I got the yen to do any cooking with the range top or oven? Oh man. I know, if you can't stand the heat...but seriously.

To help address the problem, other than using our ceiling and floor fans, David bought a solar powered attic fan, which we had shipped down to us from the States, and is now located on the roof above the kitchen window (props to Dave Waiting for lending his expertise and time).


You see, our house has a small crawl space area in the roof area and air vents in the front and sides. And while those vents help some, the air in the back of the crawl space was kinda' stuck. The hope is that the solar fan will help suck that hot air out and bring the inside temperature down a couple or few degrees. And believe me, every degree of coolness you can get can make a difference to your level of sanity.
 
Purse-itis

So while I have documented my penchant for being a clothes horse, there's another thing that I have an addiction to: purses. Can't help myself; I see a cute purse and the next thing I know, I'm reaching into my wallet to make a purchase. I thought I kinda' moved past this addiction when we moved here. I had quite a collection in my State-side closet, most being made of leather. But knowing that leather doesn't generally hold up here very well (i.e. mold), I gave all but a few away. I packed some nylon tote bags and backpacks and figured they would do the trick.

And they did, until my friend Colleen introduced me and few other ladies to a woman she knows that runs her own little company, Chill's Creations, and sells handbags that she makes by hand. Before I knew it, the addiction was back.

I had intended to only buy two bags, but when I saw her stock left over from a local arts and crafts fair, I couldn't resist and ended up with three:

This one has a zip pocket at the top, as well as the one on the front. The strap is long enough to cross the body and is a great size for when you don't want to haul around a ton of stuff.
 
I fell in love with the color and design, not to mention the handy little purse that comes with it. The main bag has a zippered closure at the top and a zip pocket inside.
 
Great sized shoulder bag -- not too big, not too small. Like the one above, it has a zip top closure and zipped pocket inside.

The material used on these bags, as well as all the others she offers is good quality and the craftsmanship is superb. And get this: I snagged all three for $65 BZD or $32.50 USD.

Hopefully these beauties will keep my addiction at bay for some time, as long as Colleen doesn't tempt me with any new additions to Chill's catalog.

Friday, March 8, 2013

Whole Roasted Chicken with Compound Butter, Red Potatoes, and Broccoli

Let me begin this post by sharing the fact that I have had a long time love affair with roasted chicken, rivaled only by my love affair with bacon...oh, and cheese...ummm, and bread.

But there's something about the smell, texture, and taste of a well-cooked bird that just sets my mouth to water like almost nothing else. It does its own version of shouty caps saying, COMFORT FOOD! A roasted chicken can make a bad day good and a good day even better.

Living here in Belize, my chicken addiction is easily fed because this humble fowl is a staple ingredient in many dishes. And while I've made a couple of the local favorites, roasting a whole bird is hands-down my preferred method.

Now something you should be aware of when buying whole chickens here: there is a surprise inside! Yup, sorta' like a box of Cracker Jacks, but a little, uh, different. In addition to the liver and kidney that comes inside most birds, you also get...


...the feet. Now I never even encountered chicken feet until I moved to North Carolina. There you can buy a slew of them in the poultry section. At first, I had no idea why on earth one would want feet. But then after checking around and doing some research, I discovered they do amazingly wonderful things if you add them to stock. Granted, you need to get over seeing chicken toes rise to the surface of your stockpot, but trust in the fact they will add body and flavor.

If you're not into making your own stock or the idea of working with chicken feet just unhinges you, and I'm not passing judgement here (ahem), you can just toss the toes.

As far as preparing the bird, I like to spatchcock it. I always giggle when I say the word "spatchcock", but it's most likely because my seven-year old self comes out. All this means is that you cut out the backbone. Why? 'Cause the bird will lay flatter and roast more evenly.


You can certainly use a sharp chef's knife to cut the bone, but I find a trusty pair of poultry shears do a great job.


Here you can see I've cut it almost all the way out. This bone will go into the freezer, with the feet, and later the carcass to make a batch of stock.

Now to take this baby to the next level of taste, I made some compound butter:


This is really, really, I mean really easy to do. Just take a stick of softened butter and add whatever herbs that make your heart go pitter pat. For this batch, I tossed in some fresh, flat leaf parsley and fresh oregano.

I reserved about a third of the butter, so it could be used with my potatoes later. The majority of it I used with the chicken. First I used my fingers to loosen the skin from the breast and around the thighs:


Looking at this shot, it rather appears that I'm giving the chicken the finger, but I digress. With the skin away from the meat, it was time to slather the butter underneath.


This is a messy job, which explains why David took all these shots (Good job, hon!). In addition to slathering the butter under the skin, I also gently massaged it all over the outside.

When complete, I put the chicken into a pre-heated 400-degree oven to do its roasted goodness for about  one hour and 15 minutes.

In the meantime, I cubed up my red potatoes and got them into a pan of salted water:


All this time, the chicken is roasting away filling the entire house with its buttery, chickeney aroma. Heaven!

And here's what it looked like when it was all done:


Crispy bits of skin and juicy meat. I tented it with some aluminum foil and let it rest for about 40 minutes. This would allow those juices to retreat back into the bird.

That gave me enough time to boil the potatoes, add the reserved compound butter once they were drained, and steam some broccoli.

Time to eat!


Oh my...the chicken was incredibly moist and had all those subtle parsley and oregano hints, which also carried over to the creamy potatoes. I would have been supremely happy with just that, but in an attempt to provide a well-rounded dish, there was also the broccoli. Nicely steamed, not soggy, just the right amount of texture to balance everything out.

Ahhh, roasted chicken -- happiness and comfort in each and every bite.

Wednesday, March 6, 2013

Kitchen Bar Top Complete!

It's taken way longer than we thought it would, but our bar top that finishes off the kitchen island is finally done.

But before we get to the big reveal, let me share what it took to get here. First David came up with the bar top design:


Please note the ogee edge all around the glass, along with the diameter of the three holes. These will come into play later.

We had hoped to have it made at the glass shop here in Corozal, but that didn't happen for a variety of reasons, which I blogged about last December. Instead, we had the work done by a shop located in Chetumal, Mexico. We were told that it would be ready around the beginning of February, but that didn't happen. Then we were told it would be ready somewhere near the end of February. Well that did happen, but not before a few day's delay for when the truck transporting the bar top from the factory in Mexico City broke down on its way to the showroom in Chet.

While waiting for the glass to get done, we knew we were going to need some sort of support brackets, as well as bolts, to keep the glass secure. We had picked up bolts on an earlier trip to Belize City, which explains the 1/2" diameter request for the bolt holes in the design.

But getting brackets was another matter. We wanted something thin enough to fit between the front cabinet doors on the island, but sturdy enough to support the glass. They were going to need to be custom made.

Yet again, David sat down with his laptop, came up with a design, then was off to Capital Metal (right here in Corozal) to see if they could do the job. Turns out that not only could they do the job, but said they could have the brackets done in less than a week. At this point in our remodeling efforts, we just nodded our heads and said, "yeah, right".  But lo and behold, they got them done early!


To be on the safe side, we had five of these made and painted -- one being a bit bigger than the others to be used as the middle support. From what I recall, they averaged out to be around $12.50 USD each and that included the painting.


Here they are mounted, waiting for the bar top to arrive. During this interim, I used the time to train myself not to jab my hip on the pointy ends of the bracket, with only marginal success.

Then finally, this Monday, the glass was here:


Whaddya' think? Pretty cool, huh? Those brackets almost disappear and gives the illusion of the glass just floating there.

But things didn't go quite as smoothly as we hoped. Remember that ogee edge I pointed out earlier? Well that didn't happen. We got a half-bullnose. And remember those 1/2" holes that were to be drilled for the bolts we bought? Well, that didn't happen either. Instead, they drilled 7/8" holes. Why? 'Cause they could. 'Cause they don't need any stinkin' design plans. 'Cause who knows?

When David pointed out the issues, the guys at the shop did acknowledge them, still without giving any reason. But they did end up knocking 10% off the price and found three bolts that would fit, which they threw in for free.

And believe it or not, this piece of glass made it from Mexico City, to Chetumal, then here to Corozal mounted only on a piece of plywood, wrapped in some paper, and transported in the back of pick-up trucks. But there aren't any scratches or nicks or chips. Go figure.

At the end of the day, we're more than happy with the end result -- even though it took over two months and didn't turn out exactly how we expected. Of course, now we have to teach the cat to not jump up on it. Yeah, I know, good luck with that.

But Wait! There's More!

Just when you thought our kitchen was complete, there still one more kitchen project  in the works.


See where the table is along the side wall of the kitchen? Well, the table (and the six chairs) are being adopted by friends of ours and we'll use the space for...

...a corner cupboard and a desk area! David designed the cupboard in such a way that we'll have a pull-out shelf for the water bottle, a bin for dog food, plus lots of shelves to use as a reserve pantry/storage area. The desktop will be the same type of wood design as the countertops. The cupboard and the desk base will be white, with doors to match our kitchen cabinets. I'll move my computer from the spare room to the new desk and will be able to be within easy reach of all my recipes and be a pain in the ass to David while he works on his laptop in the living room.

We're using the same contractor who did all our kitchen stuff, and he expects to be able to start the job in about three weeks. Then it will take about three weeks for the actual build to take place. As the word "about" is a relative term, and the concept of time is relative living in Belize, we figure we should see it sometime around mid- to late May. Watch for updates!